Microsoft Excel is a program in the Office 365 suite typically used to store, sort, and manipulate data. Although Excel is not a database, it is often used in data analytics and finance careers to assess large amounts of information and create visualizations. It’s also a commonly used tool in project management to organize information and track details.
In this guide, we’ll go over:
- What Is Microsoft Excel Used For?
- How to Use Microsoft Excel
- How to Learn Microsoft Excel
- How to Show Excel Skills on Resumes
- Glossary of Excel Terms
What Is Microsoft Excel Used For?
Microsoft Excel is a spreadsheet program consisting of cells organized by lettered columns and numbered rows. This grid pattern allows for easy data manipulation and conversion of data into mathematical formulas. Excel is typically included as part of the Microsoft Office 365 software suite.
Beyond basic calculations, Excel is great for data visualization, allowing you to create bar charts, scatter plots, graphs, and histograms from sets of information. Additionally, you can use Excel for data analysis using pivot tables and macro programming using Visual Basic for Application (VBA) — a programming language that allows you to automate tasks across Microsoft Office applications.
You can also use Excel for organizing schedules, task management, customer relationship management, and time management. It’s also an excellent tool for creating personal budgets and schedules.
Who Uses Microsoft Excel?
Many careers in finance rely on Excel for a variety of functions. For example, investment bankers use Excel to create financial models and analyze financial data. Accountants use Excel to track and report financial details and create budgets and reports. Outside of finance, data analysts across nearly every industry rely on Excel for data analysis and visualization.
How to Use Microsoft Excel
To use Microsoft Excel, you’ll need to download the software from Microsoft’s website or the App Store. The program can be bought on its own for about $160 or as part of the full Office 365 suite for around $7 per month. Many computers come with the application pre-installed, too. A free web version of Excel is also available.
Once you open the application, you can open a new workbook. A blank worksheet in a workbook looks like this:
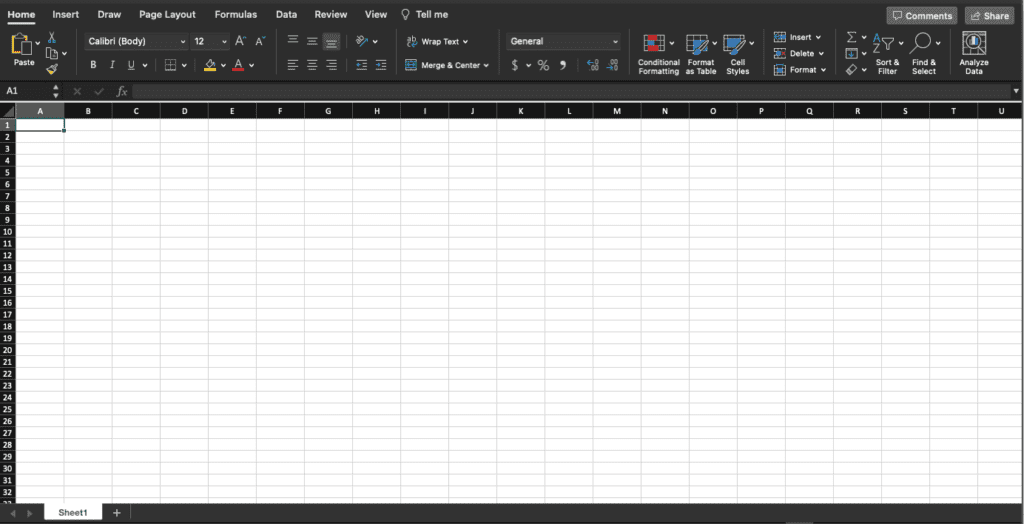
With a blank workbook, you can start doing some essential Excel tasks.
Data Entry
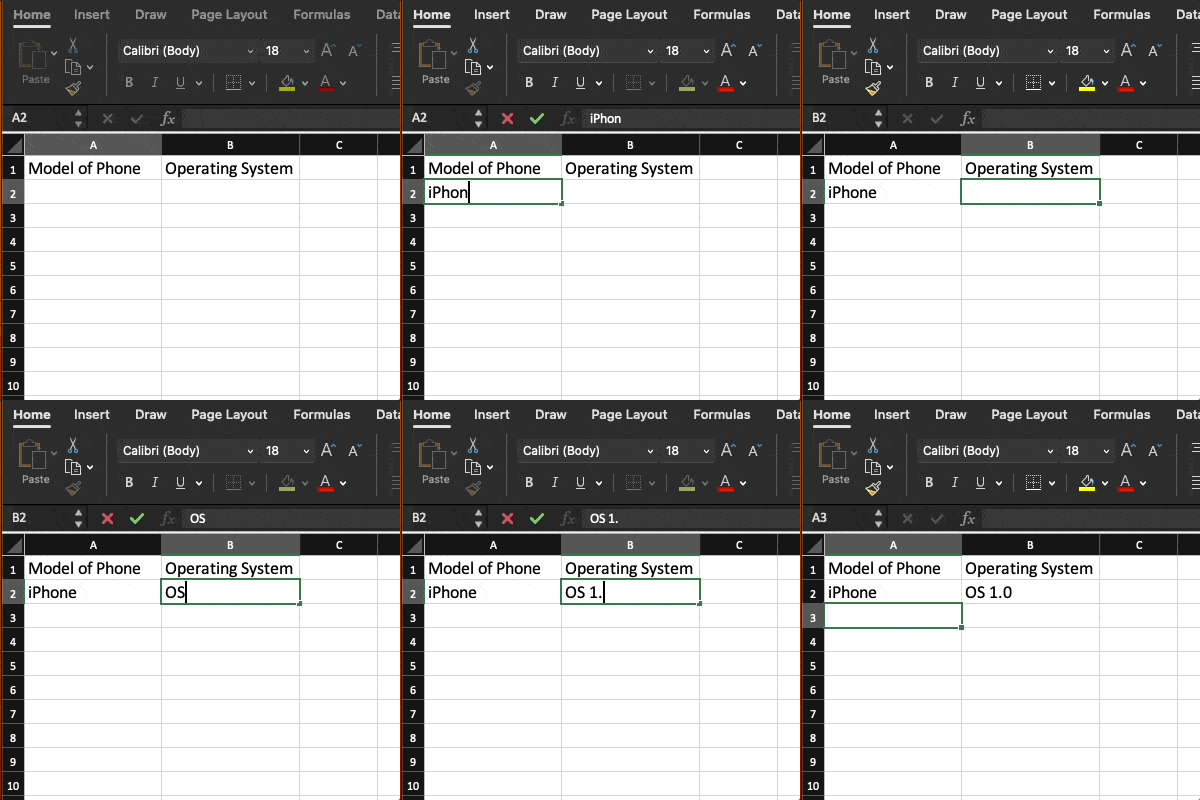
Entering data in Excel is simple. Choose the cell you want to put information in and type.
Add Columns
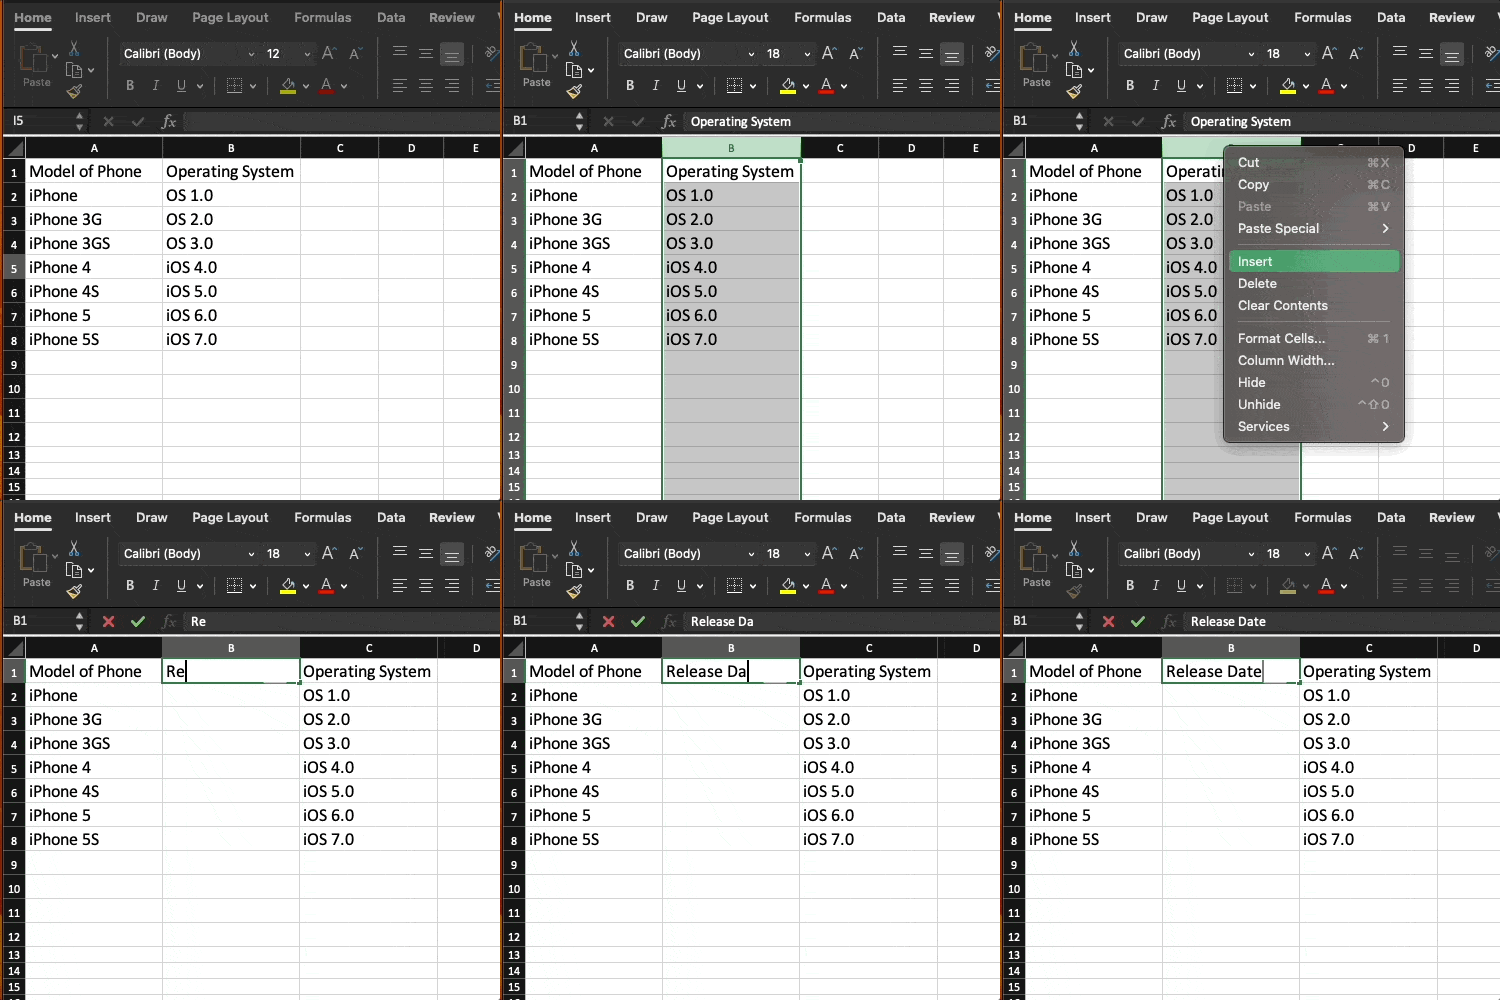
You can add columns to your worksheet by right-clicking on a column header and selecting Insert.
Add Rows
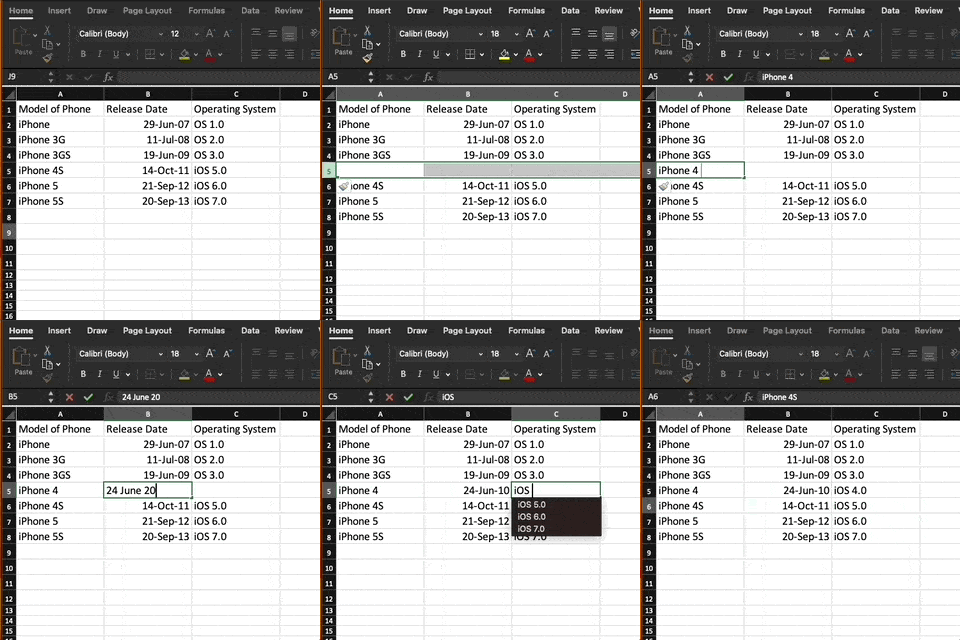
You can add rows to your worksheet by right-clicking on a row header and selecting Insert.
Freeze Rows or Columns
If you want to freeze a row or column so it stays visible as you scroll down or to the right, open the “View” menu from the navigation bar.
Selecting “Freeze Top Row” will keep the first row of your worksheet visible as you scroll down. Similarly, selecting “Freeze First Column” will make your worksheet’s first column visible as you scroll to the side.

Hide Columns and Rows
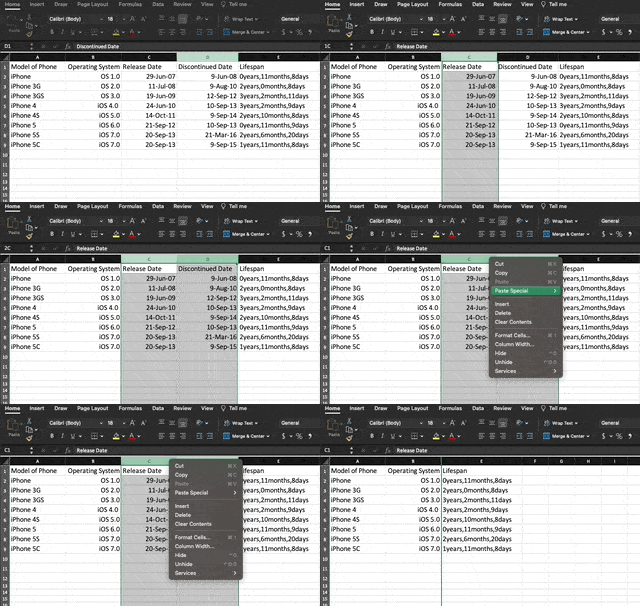
To hide columns, select the columns you want to hide, right-click on a header, and select hide. The process is the same for rows.
Remove Duplicates
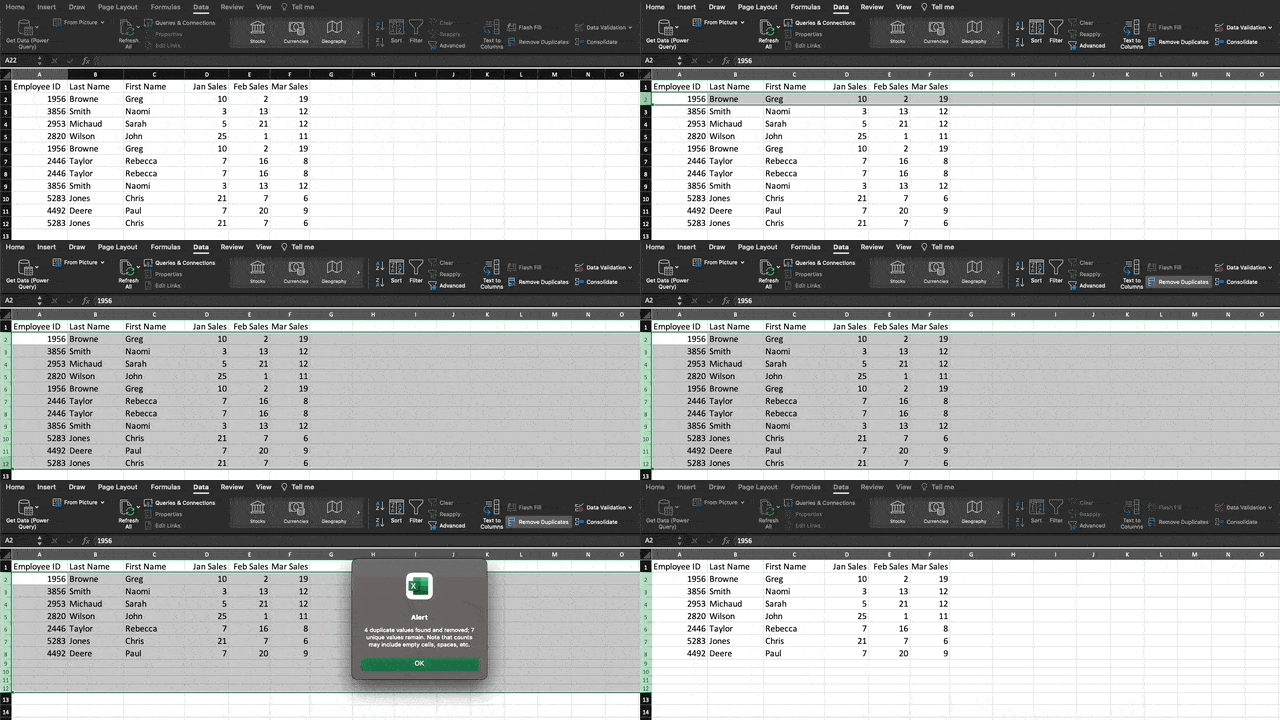
To remove duplicate data, select the range of rows or columns where you found duplicates. Then, on the “Data” tab, click Remove Duplicates. This will prompt you to select which columns to include in the removal. You can unselect a column in the pop-up window if you don’t want to delete duplicate data from it. Then, once you click “OK,” the duplicate data will be removed, leaving empty cells.
Remove Blank Rows or Columns
We can easily remove blank rows by going to “Find & Select” on the Home tab. On this drop-down menu, choose “Go To Special…” which will give you a pop-up window of options. Here, you can click “blanks” to select all blank cells. Then, under the Delete menu, choose “Delete Cells…”

You can have the remaining cells shift up, down, left, or right. Since we deleted rows in the middle of our data set, we want the remaining rows to shift up.
Sum
Once you have the basics down, you can start using formulas to make calculations and manipulate data. Formulas always begin with an equal sign (=) followed by a keyword for the formula. Basic math calculations can be often completed by using the toolbar’s AutoSum function or by entering the formula into a cell.
To find the sum of a set of numerical data, click on a blank cell and enter the formula, followed by each cell you want to be involved in the calculation, separated by commas.
For this example, we want to find the total number of each product sold for January, February, and March. So, we’ll use the formula:
=SUM(B2,C2,D2)
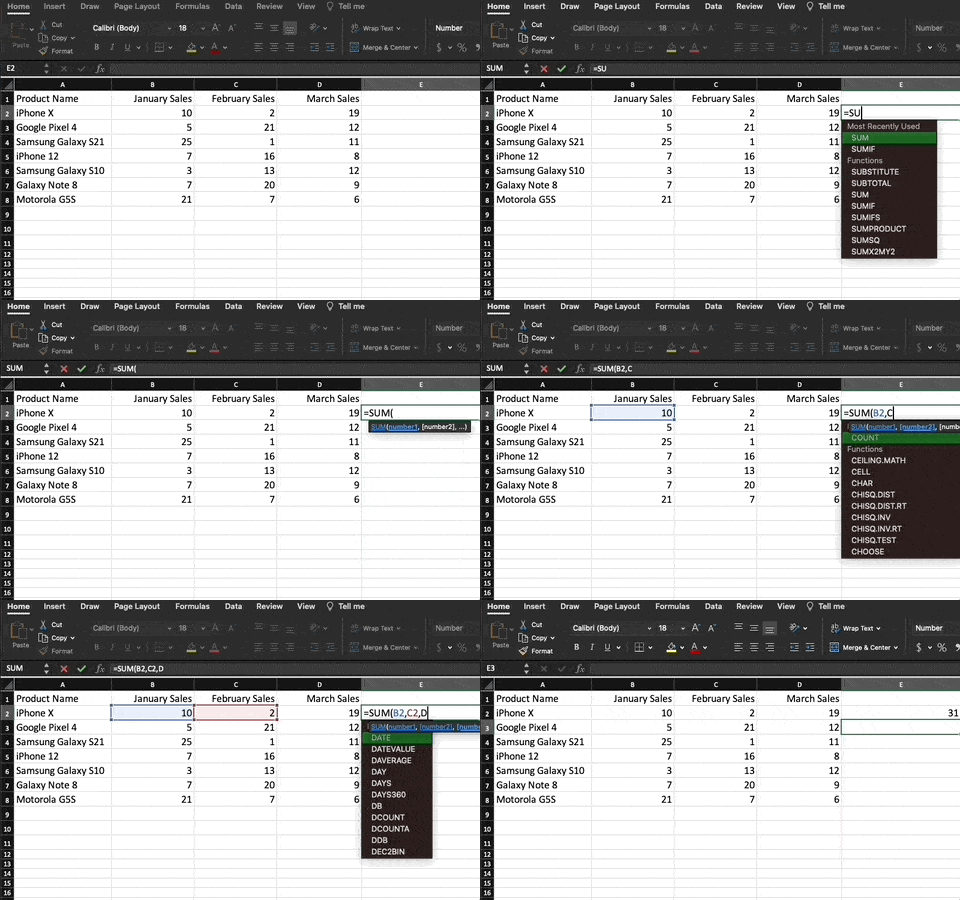
When we click enter, we’ll see the total sales across those three months.
Pro-tip: Hovering your cursor over the bottom right corner of the cell with the formula, you’ll see a plus sign. Click and drag down to apply the same function to each row and autofill.
Average
The average function works just like the sum function, except instead, we would use the formula:
=AVERAGE(B2,C2,D2)
Concatenate
Concatenate allows you to string together cells. You can use this function to put together customer names if the first and last names are located in separate cells or combine cities and states organized in different columns. The basic formula for concatenating is:
=CONCATENATE(
You can then add specific cell coordinates in whichever order you need them. If you want to add spaces between details, include ,” “, between the cells. You can also insert anything else within quotation marks, such as commas or phrases.
In this example, we want to make a sentence saying where a music artist was born. So, we’ll use this formula (# stands for the desired row number):
=CONCATENATE(B#,” “,A#,” was born in “,C#,”,”,D#)

Logic Functions
Logic functions follow logical thought processes. For example, if a car is red, it is a red car. These are useful functions to quickly sort information and make judgments.
The IF function can return a specific answer or value if a cell meets a certain condition. In this example, we want to see which Q1 products had sales above 30 units. So, our formula was:
=IF(SUM(B#,C#,D#)>30, “Good”, “Bad”)
This formula essentially says, “If the sum for January, February, and March sales are greater than 30, write “Good” in this cell. If not, write “Bad.”
Using this formula, we got these results:
The AND logic function operates in a similar way. You input what conditions you want cells to meet, and it will return either TRUE or FALSE. For example, if you input the above data, =AND(B2>5,C2<5), it will return TRUE because B2 is greater than five and C2 is less than five.
Vlookup
The VLOOKUP function allows you to find specific information in a set of data.
The formula for this function requires inputting what you want to find, where you want to look for it, the column number containing the information, and whether or not you want an approximate or exact match. You would input either 1 or TRUE for approximate matches, while exact matches require 0 or FALSE.
In this example, we wanted to find the employee with ID number 3856 from the table that spans from cell A2 to cell F8. We wanted the last name pulled from column No. 2, and we wanted an exact match.
Pivot Tables
A pivot table is a great way to organize and analyze large data sets within Excel. To create a pivot table, go to the Insert tab in the navigation bar and click “Insert Pivot Table.”
This pop-up menu will allow you to select what range of data you want to include in the pivot table and if you wish to create the table in the same worksheet or a new sheet. Once you’ve selected your data and the table destination, you’ll get this sidebar:
In this sidebar, you can choose which columns of data you want to use and where the information should go in the pivot table. For example, if you want employee first names to be the rows and sales numbers to be the columns, you can select those fields and drag them to the respective areas in the sidebar.
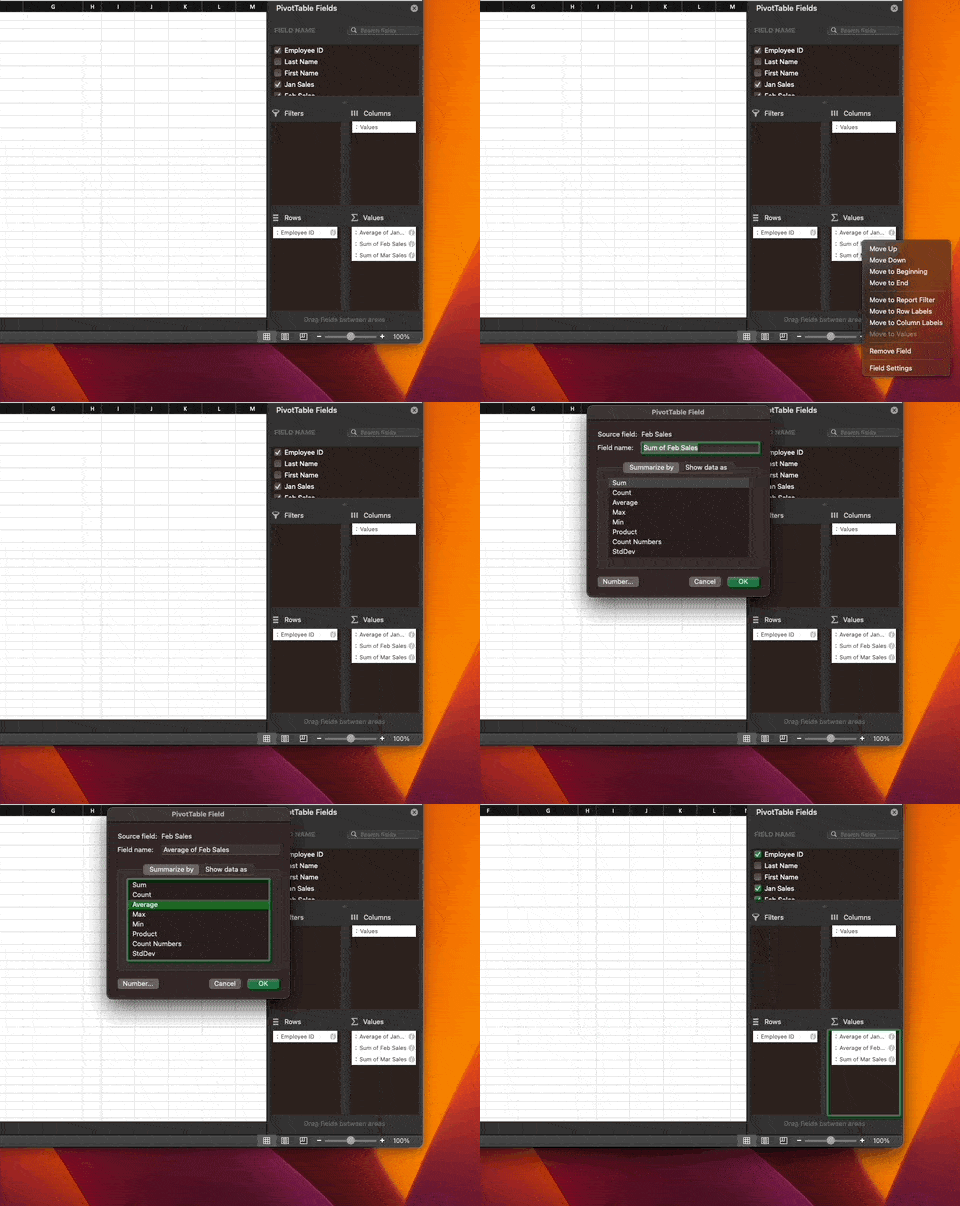
Once you have the data placed where you want it, you can change how it presents itself. For example, this pivot table has employee ID numbers as the row labels, with January, February, and March sales for columns. The table defaults to showing the sum for each column (or the sum for each month’s sales).
We can change how the data is summarized, though. So, if we want to see the average sales for each month, we need to right-click that piece of data in the sidebar, select “Field Settings,” and choose “Average” from the menu labeled “Summarize by.”
Industry-Specific Excel Uses
While the basics of Excel are the same regardless of job or industry, certain careers have specific use cases for Excel.
Functions and Formulas for Investment Bankers
- =XNPV(discount rate, cash flows, dates): This formula will calculate the net present value (NPV) of an investment using a discounted cash flow (DCF) analysis. A similar function (=NPV) also finds NPV, except it assumes each time period is equal. Using the =XNPV formula, we can input dates manually, allowing for different time frames between cash flow amounts.
- =XIRR(cash flows, dates): This formula calculates the internal rate of return using cash flows and specific dates. A similar formula (=IRR) can be used if the time span between each cash flow is equal.
- =EFFECT(interest rate, number of periods per year): This formula determines the annual interest rate for rates that compound at different intervals rather than yearly time frames. So, if an interest rate compounds monthly instead of annually, this formula can determine the annual interest rate.
- =RATE(number of periods, coupon payment per period, cost of the bond, bond face value, type): This formula can tell you the yield to maturity (YTM) rate for a security, like a bond. The number of periods is the lifetime of the bond in years, coupon payment per period is the amount paid each year, the cost of the bond is how much the bond was purchased for, and the face value is the book value of the security.
- =FV(rate, number of periods, payments, starting value, type): This formula determines the future value of an investment if it has regular payments and a stable, compounding interest rate.
- =SLOPE(dependent variable, independent variable): This function can calculate the Beta of a security by comparing the stock’s weekly returns (dependent variable) to a specific index (dependent variable), like the return rate average across the market or for a relatively stable security.
Functions and Formulas for Accountants
- =DC(cost, salvage value, lifespan, current period): This formula calculates an asset’s depreciation or declining balance. The cost input should be the asset’s original cost, and salvage value is how much the asset is expected to be worth at the end of its useful life. The lifespan is how long the asset is expected to last and can be counted in months, quarters, years, or even decades. The current period is the numerical equivalent of how far into the asset’s lifespan it currently is. For example, if an asset has a five-year life expectancy, and we are already three years into that timeframe, the lifespan input would be 5, and the current period would be 3.
- =AGGREGATE(function, ignore, cell range): This function allows you to complete a variety of calculations while ignoring any cells that have errors, are blank, or are hidden. You will be prompted to choose a function when you input the formula. These functions are numbered one through 19 and include AVERAGE, MAX, MIN, SUM, and MEDIAN. Once you’ve chosen a function, you are prompted to select what you want the formula to ignore using a menu of seven options, such as “Ignore error values” and “Ignore hidden rows.” You then input the range of cells for the formula.
- =EOMONTH(original date, number of months forward): This formula can auto-populate the date for the last date of a month. Starting with a column of dates, you input the cell for the first date, such as 4/7/2023. Then, you enter 0 if you want the date for the end of the month you started with, 1 if you want the end date for the following month, or 2 for two months ahead. You can input -1 if you want the end date for the previous month, too.

Goldman Sachs Excel Skills for Business
Learn key Excel skills you need for any career in business with this free Goldman Sachs job simulation.
Avg. Time: 4-5 hours
Skills you’ll build: Excel, cell basics, formatting, forecasting, financial statements, visualization
Functions and Formulas for Data Analysts
- =LEN(cell): This formula can tell you how many characters are in a given cell, which is helpful for data visualizations with character count limits or for determining discrepancies between strings of letters and numbers in a data set, like product codes or user identification numbers.
- =SUBSTITUTE(cell, “original”, “replacement”): This formula quickly finds and replaces characters, spaces, or words in cells. For example, if you want to change the name of a product in a large data set, you can substitute the original name with the new replacement.
- =TRIM(data): This formula can clean data by removing unwanted spaces from the end of cell entries.
- =IFERROR(function,”text to display”): Errors in cells happen, and the IFERROR function allows you to have a specific text displayed if a cell has an error. For example, if a VLOOKUP cannot find a particular detail because of a typo, you could implement a safeguard to populate the cell with a message saying, “recheck original list spelling.”
Showcase new skills
Build the confidence and practical skills that employers are looking for with Forage’s free job simulations.
How to Learn Microsoft Excel
Many resources are available to learn Microsoft Excel, regardless of skill level. Microsoft offers a free online video tutorial that gives a great overview of the basics. Both free and paid courses for Excel are available through online learning platforms, such as Udemy, edX, and freeCodeCamp. Additionally, YouTube can be an excellent resource for learning specific functions and formulas.
Ultimately, learning Excel takes practice. Playing around with different functions within the software can help you better understand the syntax of Excel formulas and feel more comfortable manipulating data.
How to Show Excel Skills on Resumes
On your resume, you can include Excel as part of the skills section. However, there are a few different ways to do this:
- List specific abilities you have that rely on using Excel, such as making financial models.
- Explain how many years of experience you have with the program.
- Describe specific Excel functions you have experience with, such as data visualization, pivot tables, and VLOOKUP functions.
- Show your years of experience with the Microsoft Office 365 suite.
Additionally, mention if you’ve taken a formal course on Excel. You can also name-drop Excel and other software In your cover letter when describing specific, relevant experiences. Using Excel is a highly sought-after skill, so don’t be afraid to bring up your expertise in pertinent places.
Start building the skills you need today with Forage’s free job simulations.
Glossary of Excel Terms
- Cell: A box to enter or type information in created by the intersection of a lettered column and a numbered row
- Cell reference: Coordinates for a cell, listed as a column letter, followed by a row number. For example, the fourth cell down in the A column has a cell reference of A4.
- Column heading: Top row of the spreadsheet that displays the letter for each column. Clicking on the column heading allows you to select the entire column.
- Formula: An input beginning with = that forms calculations and data manipulations.
- Formula bar: Bar at the top of the spreadsheet window that displays the text you enter into a cell. You can use it to enter and edit text in a cell, too.
- Row heading: First column on the left of the spreadsheet that shows the number for each row. Clicking on the row heading allows you to select the entire row.
- Range: A set of two or more cells. You describe ranges using the uppermost left cell and the lowermost right cell, joined by a colon. For example, to select a four-by-four cell table as a range, the range identifier could be A1:D4 if the table begins in the first cell of the first row and column.
- Workbook: An Excel file that can contain many individual worksheets.
- Worksheet: An individual spreadsheet of cells made from columns and rows.
- XLS file: The default file type for Excel documents
Image credit: Canva
